1. Home
  2. /
  3. KnowledgeBase
  4. /
  5. Order Export Pro
  6. /
  7. WooCommerce Order Export PRO Manual Version 3.0+

WooCommerce Order Export Pro

This plugin mainly enables you to export your orders from your WooCommerce store.

While each store is unique and has its own individual needs, the plugin is flexible to cater for your store needs.

For assistance with the plugin, please contact us any time.

Installing the Plugin

IMPORTANT: If you are using the free version of our plugin, please DEACTIVATE it before you install the PRO version.

After purchasing the plugin, you will receive a confirmation email with your license key and all the necessary information to get started. In case you don’t receive the email, please contact us here.

Download your plugin files from the sales confirmation page or by accessing your account at https://jem-products.com/my-account

Your plugin is delivered as a zip file. WordPress makes it easier to install the plugin from this zip file. Please save the file on your computer and make a note of its location. 

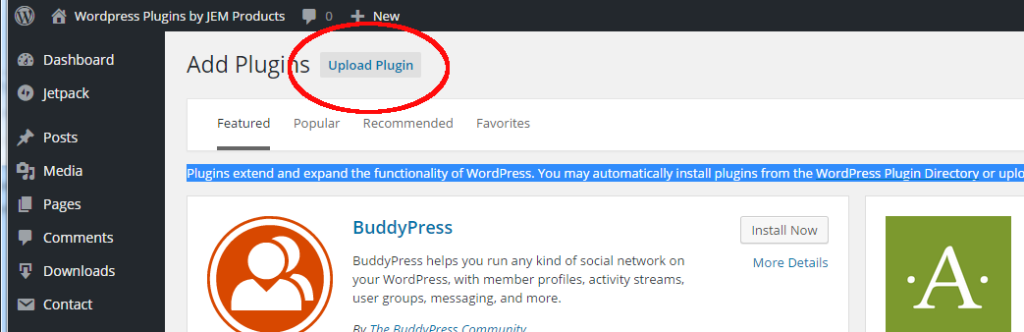
1. From your WordPress dashboard, click Plugins > Add New.

2. Click Upload Plugin as shown in the following screen.

Upload Plugin

3. Click Choose File to select and upload the plugin zip file saved on your computer.

4. Click Activate. Enter the license key you received in your email. The plugin is ready for use.

Getting Started with the Plugin

Click WooCommerce > Order Export + Pro. The WooCommerce Order Export and More screen appears.

Order Export Main Screen

The screen includes the following three main tabs:

  • Export Data – This tab allows you to run an export immediately. 
  • Settings – This tab contains various global settings for the plugin.
  • Scheduled Exports – This tab enables you to schedule exports to run automatically at a desired time.

 The following sections provide detailed description of each tab.

Export Data Tab

Suppose you want to do some analysis on your sales or refunds. 

This is the default tab where you can export data immediately. You can specify various options and filters for exporting your data using the following 5 key sections. You can click on any of these sections to expand/collapse them.

  1. DATE RANGES OF ORDERS TO INCLUDE IN EXPORT
  2. REPORT FORMAT & OUTPUT
  3. EXPORT NEW ORDERS ONLY
  4. FILTER
  5. FIELDS TO EXPORT
The following topics provide detailed description of each section.

Date ranges of Orders to Include in Export

Use this section to restrict the data export within a specific or predefined date range. 

SELECTING A SPECIFIC DATE RANGE

1. With the default Select Range option, click the FROM DATE field and select the start date (using the in-built calendar) from the day you want to export orders.

2. Click the TO DATE field and select the end date until the day you want to export orders.

3. Click EXPORT

If you do not wish to specify a date range for the export,  leave this section blank as shown in the following screen.

Date Range
Selecting Predefined Range

1. To restrict export by selecting a predefined time range available on your system, click Predefined Ranges option as shown in the following screen. 

Date Selection

2. Select a desired time range from the available options.

3. Click EXPORT.

Report Format and Output

This section enables you to format the output report based on several parameters such as sorting the export orders using date or order IDs, ascending or descending order, date and time format, and so on. See the following screen.

Report Format & Output
FORMATTING THE EXPORT REPORT

1. In the Report Format & Output section, specify the following options:

  • SORT BY – Click on this option to sort your export report based on either date or order id of the export orders.
    Default value is Date.
  • IN – Click on this option to arrange your report either in ascending or descending order.
  • DATE FORMAT – Click on this option to choose a date format of the orders in the output report.
    Available formats are
    June 22, 2020, 2020/06/22, 06/22/2020 and 22/06/2020.
  • TIME FORMAT – Click on this option to choose the time format of the orders in the output report.
    Available formats are 9:00 am, 9:00 AM and 09.00
  • FILENAME – Specify a name for the output file of your export order (followed by the extension .csv).
  • CHARACTER ENCODING – Choose UTF-8 or UTF-16 as the character encoding for your report content.
  • FIELD DELIMITER – Choose the character you want to use to separate columns in your export. For example: comma (,)
  • LINE BREAK – Choose the character you want to use to end a line in your export.
  • EXPORT LINE ITEMS AS – Choose to arrange multiple products in separate rows or separate columns.
  • CUSTOM CODE – (TBD)
 2. Click SAVE SETTINGS.

Export New Orders Only

This is an efficient feature of the plugin. The plugin can keep track of the orders that were already exported and therefore, can run and export just the latest (new) orders. This feature is helpful if you have to run adhoc exports multiple times in a day, week or in a specified timeframe. It saves your time and efforts. 

Select the option Only export new orders and specify the order number after which the export must start. See the following screen.

Export New Orders | WooCommerce Plugin

Filters

You can narrow your exports using the following filters:

  • Order Filter
  • Product Filter
  • Coupon Filter
The following sections provide detailed description of using these filters.

Order Filter

This is the default filter that enables you to narrow your export based on the order status and the order fields with their respective conditions and values.

Order Filter | WooCommerce Order Export PRO

1. From ORDER STATUS, select the status of the orders you want to export. Available options are:

  • Pending Payment
  • Failed
  • Processing
  • Completed
  • On Hold
  • Canceled
  • Refunded
Note: To export orders of all statuses, leave this option blank.
2. In ORDER FIELDS, select the desired filter, its appropriate condition and value and click Add.
For example: To add all orders with order ID numbers less than 520, select the option as highlighted in the following screen and click Add.


Order ID Filter

Product Filter

This filter offers two options as seen in the following screen:

  • FILTER BY PRODUCT – Specify the product name that you want to include in the export.
    Type partial or full product name and select the desired product that appears on the screen.
  • FILTER BY PRODUCT CATEGORY – Specify the product category name that you want to include in the export.
    Type partial or full product category name and select the desired category that appears on the screen.
Product Filter

Coupon Filter

You can filter the export by specifying coupons that were included with the order. This filter offers two options as seen in the following screen:

  • ANY COUPON – Select this option to include all orders with a coupon. Orders without coupons will not be included in the export.
  • SPECIFIC COUPON – Specify the coupon codes of the products you want to export.
Coupon Filter

Fields to Export

You can select the fields for your export by dragging and dropping them from the export list.

 The comprehensive export list is on the right pane with related fields grouped together under a common group name. From this list, click on a group name to drag-and-drop its fields to the left pane. You can even create your customized field name by clicking Custom Fields as highlighted in the following screen and adding its metadata.

Fields to Export

Note: On the left pane, you can drag and drop to arrange the sequence of the fields as desired to view on the export. You can click the delete button corresponding to a field to exclude it from the export anytime.

Export Preview

Click Preview at the bottom of your screen for a quick preview of your export. The first 25 records of your export matching your filter criteria appear in a tabular form below, as shown in the following screenshot.
Note
: You can use this feature before running a full export and ensure you’re getting the export as expected.

Preview

Running an Export

After specifying all the options and filters for your export in the Export Data tab, click Export to run a full export of the orders as shown in the following screen. The order-export.csv file is downloaded to your system.

WooCommerce Order Export and More

Settings

Click the Settings tab. The General Settings page displays your scheduled exports and helps in importing your settings from one site to another site. It is divided into the following three sections:

  • Cron Log
  • Export Settings
  • Import Settings
General Settings

The CRON LOG section displays the current server date and time. It keeps a log of your scheduled exports and helps you view how many records are executed. 

The Export Settings section contains the settings of all your order exports. You can import these settings from one site to another site by just copying the content from this section to the Import Settings section and clicking IMPORT.

In case of any unexpected issues with your exports, you can send the content in these sections to the Support team for troubleshooting purposes and get your issues resolved.

Scheduled Exports

Click the Scheduled Exports tab to schedule exports at a desired date and time. You can create as many scheduled exports as you want, and get the export details delivered via email, FTP/SFTP and/or to a directory on your local system by specifying their respective details as shown in the following screen.

Email Delivery

Scheduling an Export

1. On the Scheduled Exports tab, click Add New Job. The following screen appears.

Scheduled Exports

2. In EXPORT NAME, type a name for the new export.

3. Under WHEN TO RUN THE EXPORT, choose one of the following options:

  • Specific Day(s) – Select the day(s) and time for running the report.
  • Predefined Schedule – Select the predefined schedule from the options available on your plugin. Options include Daily, 1st day of the month, Last day of the month and Every Hour.

4. Under DELIVERY DETAILS, select the method(s) through which you want the export delivered after the scheduled run. Options include Email, FTP/SFTP and Directory.

  • Email – Select this option and specify the email address(es) to which you wish to send the export details.
  • FTP/SFTP – Select this option and specify the details of your FTP/SFTP server by clicking the FTP tab.
  • Directory – Select this option and specify the directory location on your local system along with the filename of the export, by clicking the Directory tab.

5. For specifying the remaining options and filters, refer to the detailed instructions documented in the Export Data Tab in this manual.

6. Click Save Export.

All scheduled exports run as per the specified time and are displayed with their basic details in this tab.

Share this post

Share on facebook
Share on google
Share on twitter
Share on linkedin
Share on pinterest
Share on print
Share on email
Scroll to Top
Scroll to Top