1. Home
  2. /
  3. KnowledgeBase
  4. /
  5. Table Rate Shipping Pro
  6. /
  7. How To Set Up Per Item Shipping In WooCommerce

How to Set Up Per-Item Shipping in WooCommerce

“Shipping” in the e-commerce world is a crucial component that can materially influence sales in your store. 
A very common shipping method we find in the e-Commerce store is “per-item shipping” that involves charging shipping based on the number of items on the cart.
You can offer customers with a wide variety of shipping methods using our WooCommerce Table Rate Shipping Pro plugin.

This article walks you through simple, step-by-step instructions on setting up the per-item shipping in your store.

Different Methods of "Per-Item" Shipping

We begin with two different ways of charging per-item shipping:

– Direct Per-Item Shipping Charges (“Per-Item” Shipping Charges for any number of items): In this method, we configure a single table rate charge. The base charges and the shipping charges for any number of items remain constant irrespective of the number of items purchased. 
For example: We create a shipping class (item) called T Shirts with its base amount charge as $3 and the shipping charge per item as $0.5 for any number of items purchased.

– Sectional Per-Item Shipping Charges (Divide “Per-Item” Shipping Charges into Two Sections): In this method, we divide the table rate into two sections. The first section will have “zero” shipping charges for the first “n” number of items. In the second section, we specify the actual shipping charges for items starting from the (n+1)th item and subtract the shipping charge value for the first “n” items from its base charge. We do this amendment in the second section so the plugin excludes the shipping charges for the first “n” number of items and applies the shipping charges only from the (n+1)th item.

For example: We retain the shipping class (item) T Shirts. Then we divide the table shipping rates into two sections. 
In the first section, we configure the base amount charge as $5.95 and “zero” shipping charge for first three items. 
In the second section, we configure a shipping charge of $0.5 per item starting from the fourth item, and amend the existing base charge of $5.95 by subtracting $1.5 from it. (In this example, we arrived at subtracting $1.5 because we chose to waive off the shipping charge value of $0.5 for the first 3 items). This way, we ensure the plugin excludes the shipping charges for the first three items and calculates the shipping charges only from the fourth item. 

Direct Per-Item Shipping Charges

1. Adding the New Product "T-Shirts"

1. Click Products Add New on the left navigation pane.

2. On the Add new product screen, type the product name as T-Shirts. Specify its Regular price as $9.99 as shown in the following screen.

Add New Product

3. Click Publish on the right pane.

2. Adding the Shipping Class "T Shirts"

1. Click WooCommerce Settings on the left pane.

2. Click the Shipping tab. The following screen appears.

Shipping Classes

3. Click Shipping classes as highlighted in the above screen.

4. Click Add shipping class at the bottom-right corner of the screen.

5. In the Shipping class name text box, type the first shipping class as T Shirts and click Save shipping classes.

3. Assigning the Shipping Class to the Product

After adding the product and the shipping class, assign the shipping class to the product. The WooCommerce Table Rate Shipping Pro plugin uses this shipping class to calculate the shipping costs of the products.

In this example, we assign Per Item Based Shipping to T-Shirts

1. Click Products on the left navigation pane.

2. On the right pane, click on the T-Shirts product you created earlier.

3. Scroll down, click the Shipping tab and select Per Item Based Shipping as the shipping class to assign it to T-Shirts. See the following screen.

Shipping Classes Assigned

4. Click Update on the right pane.

4. Setting Up the Shipping Zone and the Shipping Method

Firstly, we add a shipping zone for the customer based on their shipping address. In this procedure, we specify United States as the shipping zone. We then add the shipping method Table Rate Pro to that zone.

1. Click WooCommerce Settings on the left pane.

2. Click the Shipping tab. 

3. Click Add shipping zone.

4. Type the Zone name as U.S. and select the Zone regions as United States.

5. Click Save changes.

6. Click Add shipping method. The Add shipping method window pops up.

7. Select Table Rate Pro.

8.  Click Add shipping method. The new shipping method Table Rate Pro is added to the shipping zone as displayed in the following screen.

Table Rate Pro Shipping Method Added

5. Setting Up the Table Rate

1. Click on Table Rate Pro (highlighted in the above image) and then click Add New to add a new shipping rule to it.

2. Select the option Enable this shipping method.

3. Type a title for the shipping method in Method Title. In this example, it is Standard Shipping.

4.  Click Add New Rate to specify the Condition as Item Count, Min Value and Max Value to 1 and * respectively, Base Amt as $3 and Per Item shipping charge as $0.5 as shown in the following screen.

Note: The value of * is infinity.

Shipping Rate | Per Item

6. Viewing the Results

After configuring these values, it’s time to verify the results in your store.

1. On the top-left corner of the screen, click WooCommerce Plugins by JEM products > Visit StoreThe product T-Shirts appears on your store.

2. Under T-Shirts, click Add to cart

3. In the cart, for verification, let us increase the Quantity of T-Shirts to 3.

4. Click Update cart. The shipping charges for 3 items are displayed as $4.5 as per the configuration in the Table Rate Pro.
= (base amount) + ($0.5 shipping charge per item * 3).
= $3 + $1.5
=$4.5

Cart Example

Sectional Per-Item Shipping Charges

We begin with the same procedure of adding the product, adding the shipping class, assigning the shipping class to the product and then set up the shipping zone and shipping method. Please refer to the instructions documented above in the following sections.

1. Adding the New Product “T-Shirts”

2. Adding the Shipping Class “T Shirts”

3. Assigning the Shipping Class to the Product

4. Setting Up the Shipping Zone and the Shipping Method

After performing these tasks, the shipping rates are configured in two sections. The following section explains this new method with a detailed example.

1. Dividing the Table Rates into Two Sections

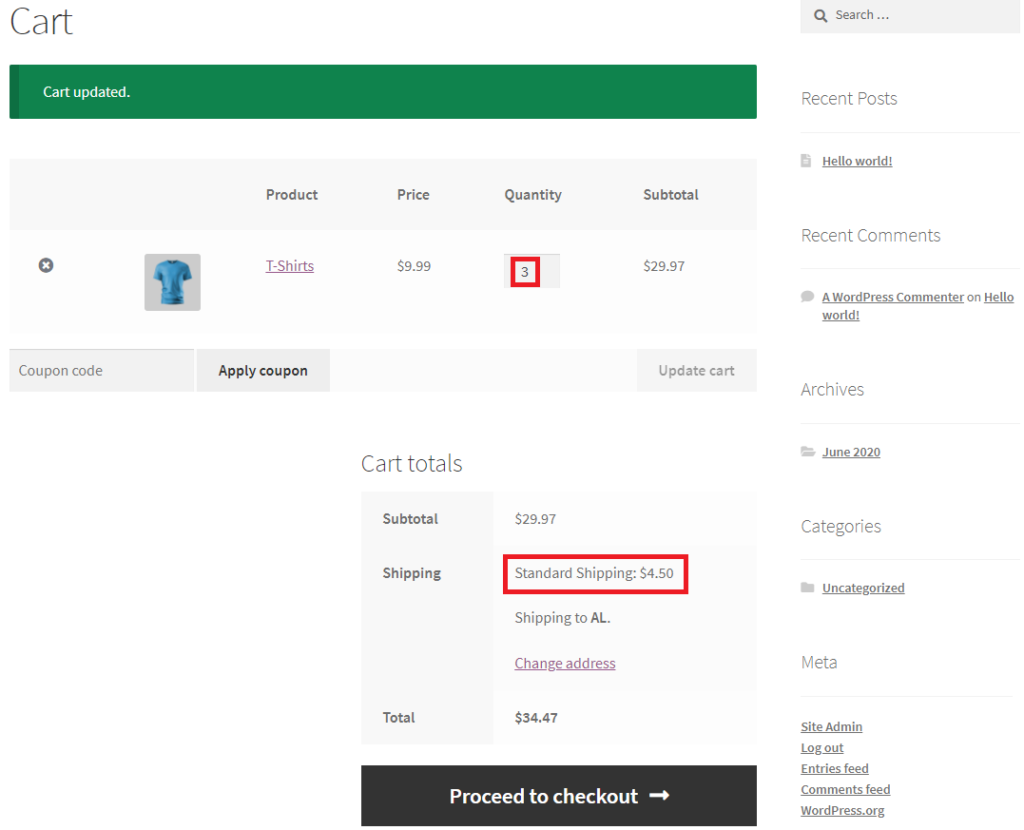
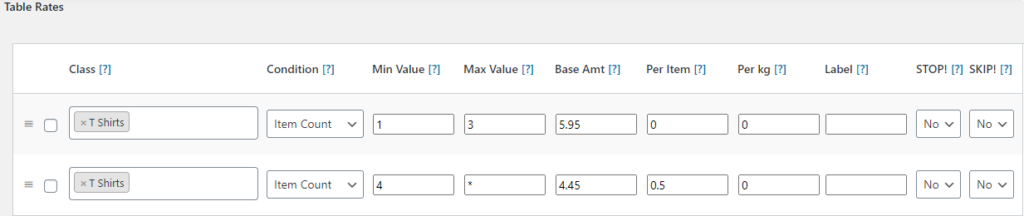
Suppose you want to offer customers with a specific base amount and “zero” per-item charge for the first three items and then, starting from the fourth item, you want the shipping charge to be $0.5 per item. So if a customer buys 4 items, the per-item shipping charge must be $0.5 only for the fourth item and not for all the 4 items. To offer this shipping method for the customers, we split up the table rates into two sections.

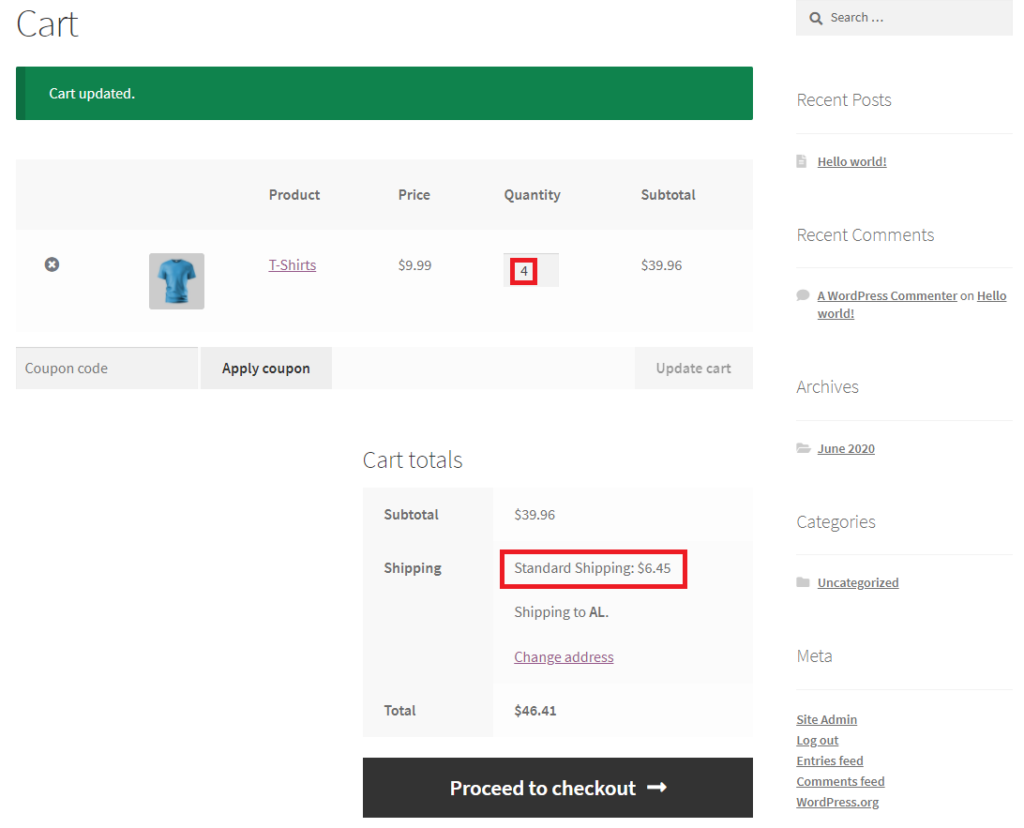
In the first section, we configure the base amount as $5.95 and “zero” per-item shipping charge for first three items. This means the customer is charged only $5.95 for the first three items. This also means, for the fourth item, the customer must be charged $5.95 + $0.5 = $6.45. 

However, if we retain the same base charge of $5.95 in the second section, the charges will mathematically be calculated as $5.95 +($0.5*4) = $5.95 + $2 =$7.95. This is not the actual shipping charge. 

So, in the second section, we amend the base charge by reducing the base charge for the first three items which is $0.5 *3 = $1.5. This means, we subtract the $1.5 from the base charges in the second section. So the base charge in the second section becomes $4.45. ($5.95 – $1.5 = $4.45). To this, the shipping charges of $0.5 are added per item starting from the fourth item. 

Look at the following example.

1. Click on Table Rate Pro and then click Add New to add a new shipping rule to it.

2. Select the option Enable this shipping method.

3. Type a title for the shipping method in Method Title. In this example, it is Standard Shipping.

4.  Click Add New Rate and specify the first table rate with the following values:

Class

Condition

Min Value

Max Value

Base Amount

Per Item

T Shirts

Item Count

1

3

5.95

0

5. Click Add New Rate to specify the second table rate with the following values.

Important: While specifying this rate, it is important to reduce the base amount to $4.45.

Class

Condition

Min Value

Max Value

Base Amount

Per Item

T Shirts

Item Count

4

*

4.45

0.5

Now the divided Table Rates look appear as in the following image.

Table Rates

2. Viewing the Results

After configuring these values, it’s time to verify the results in your store.

1. On the top-left corner of the screen, click WooCommerce Plugins by JEM products > Visit StoreThe product T-Shirts appears on your store.

2. Under T-Shirts, click Add to cart

3. In the cart, for verification, let us increase the Quantity of T-Shirts to 4.

5. Click Update cart. The shipping charges for the 4 items are displayed as $6.45.
This is the actual value of the purchasing four T Shirts with the initial base charge of $5.95 and free shipping charges for the first three T-Shirts + $0.5 shipping charge for the fourth T Shirt.

How the Calculation Was Made

The amended base charge + shipping charge from the fourth item 
= [($5.95 -$1.5) + $0.5(number of items purchased starting from n+1)]
= $4.45 + $0.5(3+1)
= $4.45 + $0.5(4) 
= $4.45 + $2 
= $6.45

Per Item Shipping In WooCommerce

So, are you ready to offer your customers with these methods of per-item shipping methods? 

Install our WooCommerce Table Rate Shipping Pro plugin today. For assistance, please feel free to contact us.

Share this post

Share on facebook
Share on google
Share on twitter
Share on linkedin
Share on pinterest
Share on print
Share on email
Scroll to Top
Scroll to Top