1. Home
  2. /
  3. KnowledgeBase
  4. /
  5. Table Rate Shipping Pro
  6. /
  7. How to Set Up Weight Based Shipping in WooCommerce

How to Set Up Weight-Based Shipping in WooCommerce

“Shipping” in the e-commerce world is a crucial component that can materially influence sales in your store. 
A very popular method is to ship based on the weight of the items purchased. In this article, we’ll show you how to set up weight-based shipping using
 our WooCommerce Table Rate Shipping Pro plugin.

GETTING STARTED

The WooCommerce Table Rate Shipping Pro plugin offers multiple shipping methods in your store based on the weight of the products. The following procedures help you configure these shipping methods in your store.

  1. Add a new product.
  2. Configure the shipping methods by adding the shipping zone and then the shipping method Table Rate Pro.
    Once this is done, a
    dd the new shipping methods (For example: Standard Shipping and Express Shipping) to Table Rate Pro and configure their rates as required (Sample rates are configured in the relevant section below).
  3. View the results on your store.

The following sections provide detailed, step-by-step instructions for performing each procedure.

1. Adding a New Product

This section provides instructions on adding a product using our plugin and configuring its weight.
For example, let us call it
Packaged Goods and specify its weight as 1.5 kg. 

1. Click Products Add New on the left navigation pane.

2. On the Add new product screen, type the product name as Packaged Goods

3. Scroll down and click the Shipping tab. Specify the Weight (kg) of the product as 1.5 as highlighted in the following screen.

1. Adding a New Product

Add New Product

4. Click Publish on the right pane. The product is now added in your store.

2. Setting Up the Shipping Methods and Rates

Firstly, we add a shipping zone for the customer based on their shipping address. 
For example, let us specify United States as the shipping zone. We then add the shipping method Table Rate Pro to that zone
Once this is done, let us consider creating the shipping methods as Standard Shipping and Express Shipping and configure their rates. Following are the step-by-step instructions.

1. Click WooCommerce Settings on the left pane.

2. Click the Shipping tab. 

3. Click Add shipping zone.

4. Type the Zone name as U.S. and select the Zone regions as United States as shown in the following screen.

Shipping Zone

5. Click Save changes.

6. Click Add shipping method. The Add shipping method window pops up.

7. Select Table Rate Pro.

Add Shipping Method

8.  Click Add shipping method. The new shipping method Table Rate Pro is added to the shipping zone as displayed in the following screen.

Table Rate Pro Shipping Method Added

9. Click on Table Rate Pro.

10. Click Add New to add a new shipping rule to it.

11. Select the option Enable this shipping method.

12. Type a title for the shipping method in Method Title. In this example, we name it as Standard Shipping.

13.  Click Add New Rate at the bottom-left corner of the screen to set up some sample rates for Standard Shipping (one at a time) as shown in the following screen.

Standard Shipping Rules

14. Click Save changes.

15. Go back to Table Rate Pro and add the Express Shipping method in the similar way. Click Add Newselect the option Enable this shipping method and add the new shipping method in Method Title as Express Shipping.

16. Click Add New Rate at the bottom-left corner of the screen to set up some sample rates for Express Shipping (one at a time) as shown in the following screen.

Note: For both the Standard Shipping and Express Shipping methods, the Condition is set to Weight (kg) because we are setting up the rates based on the weight of the products. The value of * is infinity.

Shipping Rules

17. Click Save changes.

18. Click Table Rate Pro to view the added shipping methods, as shown in the following screen.

Shipping Methods Added

3. Viewing the Results

After configuring these values, it’s time to verify the results in your store.

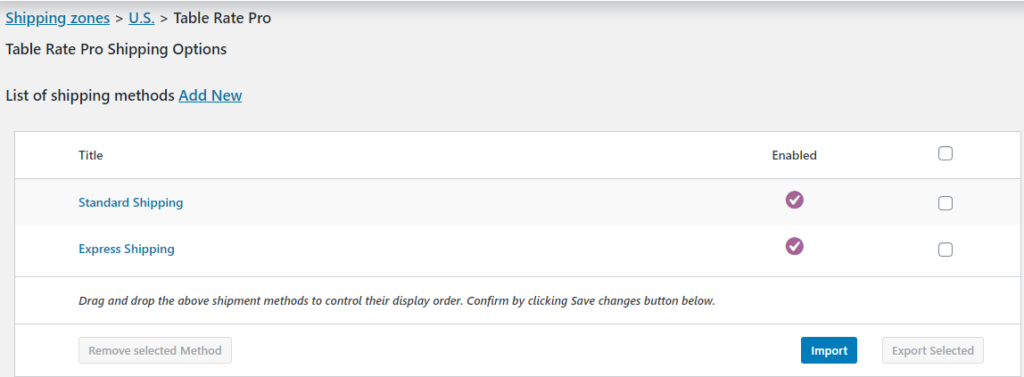
1. On the top-left corner of the screen, point to WooCommerce Plugins by JEM products and click Visit StoreThe product Packaged Goods appears in your store.

2. Under Packaged Goods, click Add to cart View cart.

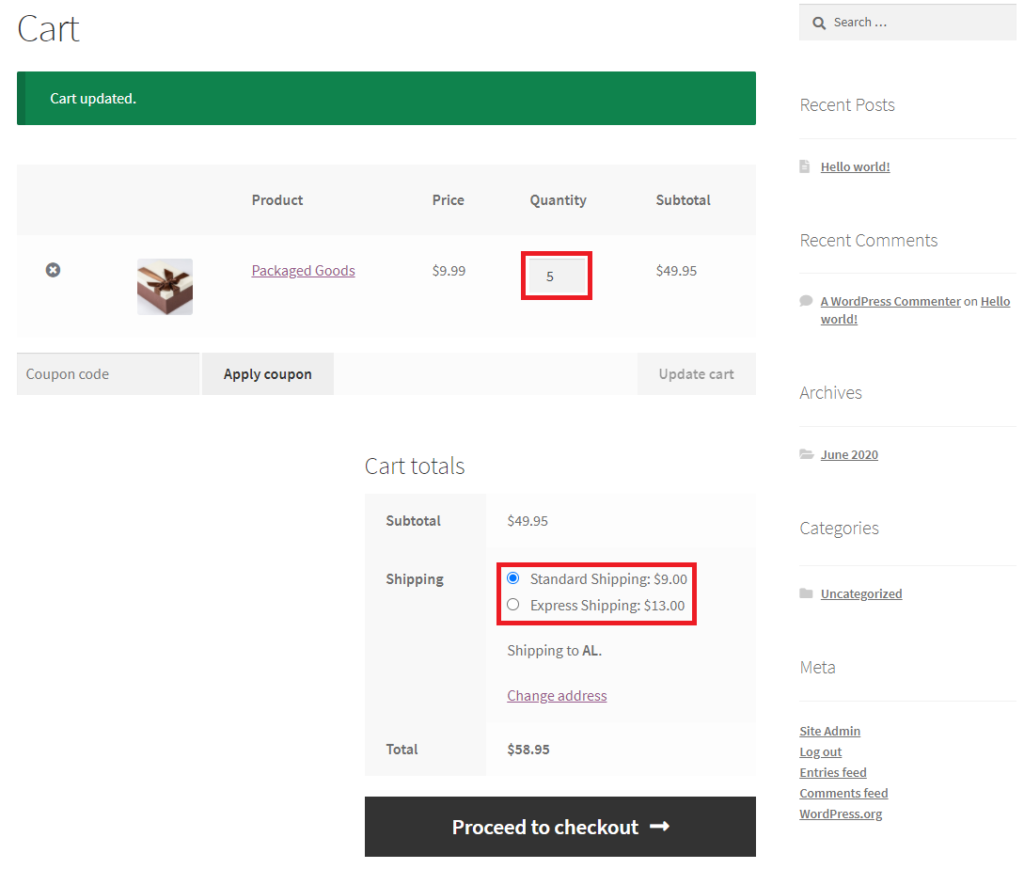
3. In the cart, for verification, let us increase the Quantity of Packaged Goods to 5.

4. Click Update cartAs per the rates configured in Table Rate Pro, the plugin calculates the Standard and Express shipping charges for the product Packages Goods based on its total weight.

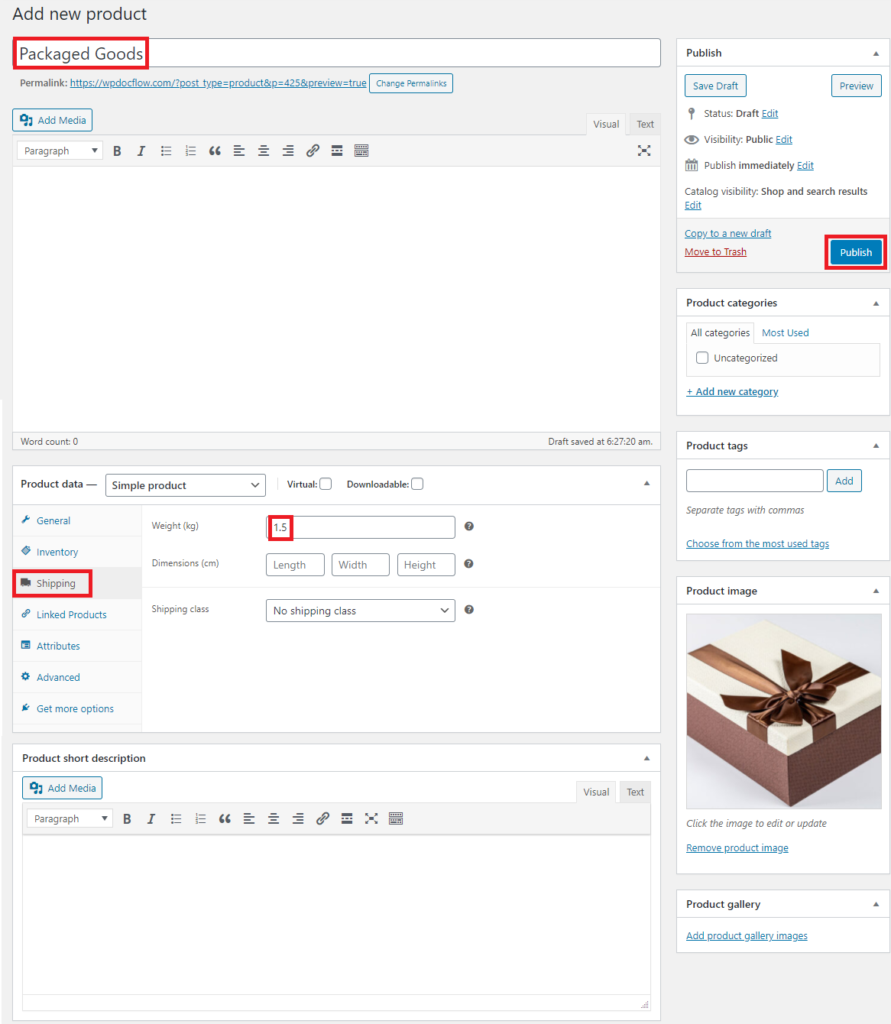
Total Weight = [Number of products in the cart (as per step 3)] * (Weight per product) 
= 5 * 1.5 kg
= 7.5 kg

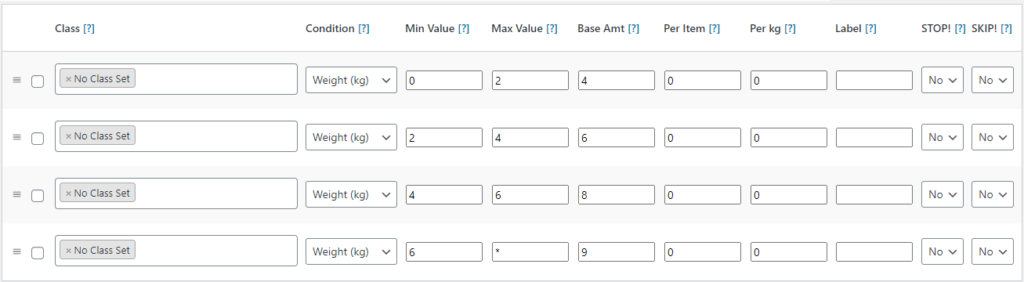
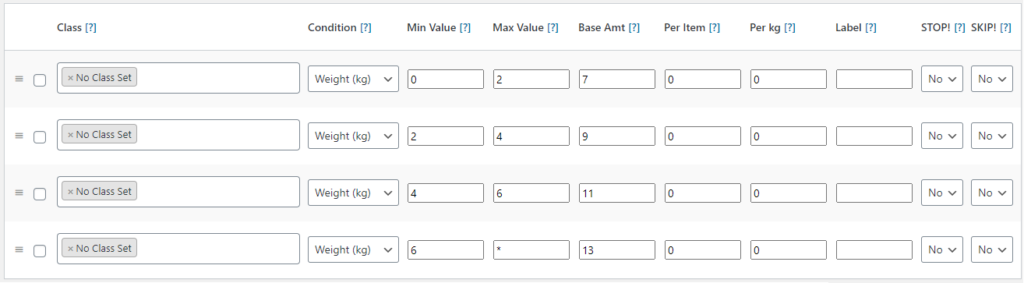
Therefore, the Shipping rates for the Packages Goods product weighing 7.5 kg are as follows:
– Standard Shipping = $9
– Express Shipping = $13

Please see the following screen displaying these charges (based on the specified product quantity).

Weight Based Shipping in WooCommerce

So, are you ready to offer your customers with a variety of products and shipping methods? 

Install our WooCommerce Table Rate Shipping Pro plugin today. For assistance, please feel free to contact us.

Share this post

Share on facebook
Share on google
Share on twitter
Share on linkedin
Share on pinterest
Share on print
Share on email
Scroll to Top
Scroll to Top