1. Home
  2. /
  3. KnowledgeBase
  4. /
  5. Table Rate Shipping Pro
  6. /
  7. How To Set Up Shipping by Item Count in WooCommerce

How to Set Up Shipping By Item Count in WooCommerce

“Shipping” in the e-commerce world is a crucial component that can materially influence sales in your store. 
There can be a wide variety of shipping methods based on your business requirements such as shipping by the number of items in the cart, shipping by weight, mixing weight-based and item-based shipping, per-item shipping, or there might be a need for even more complex shipping methods with more shipping classes and rules. Our WooCommerce Table Rate Shipping Pro plugin is designed to handle most of your shipping needs. 
A very common shipping method we find in the e-Commerce store today is “shipping by item count”. This method involves charging shipping based on the number of items (same class) in the cart, rather than just charging a flat shipping rate. So, let’s get started with using the plugin to set up this shipping method.

GETTING STARTED

Each store is unique with its own items and shipping needs. Using our WooCommerce Table Rate Shipping Pro plugin, you can have your own setup of adding new items, adding multiple shipping classes and rules based on your requirement, defining shipping rates based on the item’s destination (shipping address), shipping zones, and so on. 

This article introduces you to the concepts of “Shipping by Item Count” with a typical, real-life example demonstrating and guiding you through the entire setup through step-by-step instructions

Here’s a basic outline of the procedures you can follow in a sequence to configure shipping based on the number of items in your cart.

  1. Add a new product (item) using our plugin.
  2. Configure the shipping method by first adding a shipping zone and then the shipping method Table Rate Pro
  3. Once this is done, add a new “shipping method” as per your business requirement to the Table Rate Pro
    For example: Standard Shipping
  4. Configure the rate for your standard shipping method as required.
    This includes the base amount (fixed) and the shipping charges based on the number of items ordered.
    Sample rate is configured in the relevant section below.
  5. For verifying the configured charges, go to the store and view the sample results.

See the following sections for detailed, step-by-step instructions on performing each of these procedures.

1. Adding a New Product

Firstly, add a product (item) using our plugin and specify its regular price. During the checkout, we will be arriving at the shipping charges based on this item count.

In this example, let us name the product as T-Shirts and specify its regular price as $9.99.

1. On the left navigation pane, click Products Add New .

2. On the Add new product screen, type the product name as T-Shirts

3. Specify its Regular price ($) as 9.99.

We’re done! Adding the item and its regular price was super easy! Ain’t it?

2. Setting Up the Shipping Zone and the Shipping Method - Table Rate Pro

The next step is to determine your “shipping zones” within WooCommerce.
Shipping zone refers to the geographic region to which specific shipping rules and charge structures apply (based on the distance of the shipping address)The farther the distance, the more the shipping charges! Therefore, it’s important to set up the shipping zones in WooCommerce to charge your customers appropriately during their checkout process. 

In this example, let us specify United States as the shipping zone. We then add the shipping method Table Rate Pro to that zone

1. On the left navigation pane, click WooCommerce Settings.

2. Click the Shipping tab. 

3. Click Add shipping zone.

4. Type the Zone name as U.S. and select the Zone regions as United States (US) as shown in the following screen

Shipping Zone

5. Click Save changes.
Note
: You can have different shipping charges by narrowing down within the shipping zones to specific zip codes/postal codes. Click the Limit to specific ZIP/postcodes link under Zone regions.

6. After adding the shipping zone, click Add shipping method. The Add shipping method window pops up.

Add Shipping Method

7. Select Table Rate Pro.

8.  Click Add shipping method. WooCommerce saves the new shipping method Table Rate Pro to the shipping zone U.S. as displayed in the following screen.

Table Rate Pro Shipping Method Added

3. Adding a New Shipping Method and Setting Up the Table Rate

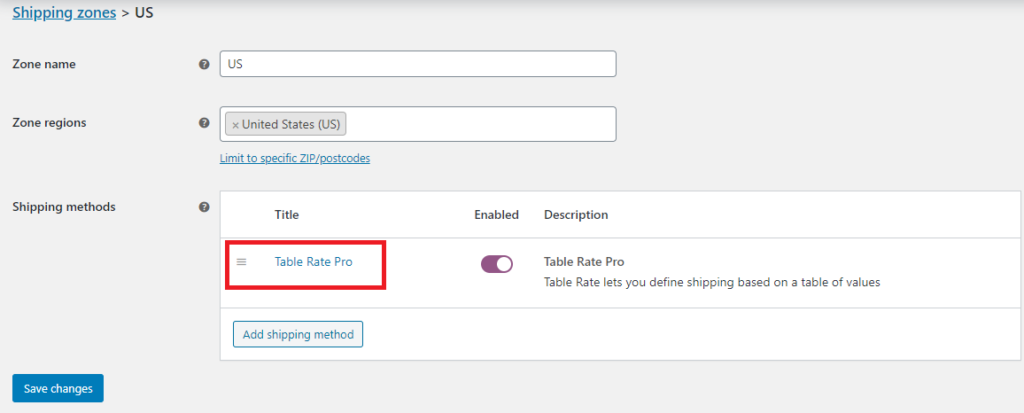
After adding Table Rate Pro, we will create a new shipping method for it and configure the shipping rates. Following are the step-by-step instructions.

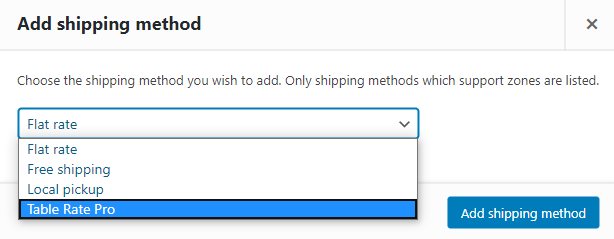
1. Click on Table Rate Pro to add a new shipping method to it. Alternatively, you can point your cursor to Table Rate Pro and click Edit.

2. Click Add New.

3. Select the option Enable this shipping method.

4. Type a title for the shipping method in Method Title
You can name it 
Standard Shipping, Express Shipping, Local PickupOvernight Shipping or with any relevant title based on your business requirement.
In this example, we name it as Standard Shipping

5.  In Tax Status, you can specify whether your shipping must be taxable or non-taxable by selecting the appropriate option from the drop-down menu.

6. You can add a Handling Fee (additional fee) if required, else you can leave it blank.

7. Click Add New Rate to set up a sample rate for your Standard Shipping method.

8. Specify the Class as No Class Set to indicate to your plugin that the current shipping rule applies to all items which do not have a shipping class configured. 

9. Specify the Condition as Item Count. 
This tells the plugin to set up shipping based on the number of items in the cart.

10. Specify the Min Value and Max Value to 1 and * respectively.
NoteThe value of * is infinity. So the configuration is applicable for any number of items in your cart starting from 1 until infinity.

11. Specify the Base Amt as $3 and Per Item shipping rate as $1. 
This enables the plugin to calculate the base charge as $3 (fixed amount) and shipping rate that increases by $1 for each item count in the cart.
The current shipping configuration is displayed in the following screen. 

12. Click Save changes to save this configuration.

4. Viewing the Results

After configuring the above shipping charges, it’s time to verify the results in your store.

1. On the top-left corner of the screen, click WooCommerce Plugins by JEM products > Visit StoreThe product T-Shirts appears on your store.

2. Under T-Shirts, click Add to cart

3. In the cart, the Standard Shipping charge for 1 T-Shirt is displayed as $4 by default ($3 base charge + $1 for 1 item count).

4. For verification, let us increase the Quantity of T-Shirts to 3.

5. Click Update cart. The Standard Shipping charge for 3 items is displayed as $6 as per the following calculation:
Standard Shipping charges = (base amount as configured above) + ($1 shipping rate per item * number of items)
= $3 + ($1 * 3)
= $3 + $3
=$6

As per the shipping configuration in Table Rate Pro, the base charge was set to a fixed amount of $3 (irrespective of the number of items in the cart) and the shipping rate was set to increase by $1 for each item count. So, in the above example, the plugin accurately calculated the Standard Shipping charges for 3 T-Shirts to the U.S shipping zone as $6.

You can verify the results further by increasing the quantity of items in the cart and then clicking Update cart. The Standard Shipping charges increase accordingly. 

As you can see in the following table, the standard shipping charges are displayed against the specific number of items in the cart. 

Number of Items (in the cart)

Standard Shipping Charges ($)

4

7

5

8

6

9

7

10

8

11

9

12

We hope this article explains how easy it is to set up shipping by item count using our WooCommerce Table Rate Shipping Pro plugin. If you would like to see a video demonstration for the entire procedure, please go here: https://www.youtube.com/watch?v=x6c3jIaiaSs

Share this post

Share on facebook
Share on google
Share on twitter
Share on linkedin
Share on pinterest
Share on print
Share on email
Scroll to Top
Scroll to Top