1. Home
  2. /
  3. KnowledgeBase
  4. /
  5. Table Rate Shipping Pro
  6. /
  7. How to Mix Free and Paid Shipping in WooCommerce

How To Mix Free and Paid Shipping in WooCommerce

“Shipping” in the e-commerce world is a crucial component that can materially influence sales in your store.
Free Shipping is an important tool in any online store. Sometimes you want to use it on its own and sometimes you want to combine free and paid shipping.
Our WooCommerce Table Rate Shipping Pro plugin is here to quickly address all your shipping needs.

This article walks you through simple, step-by-step instructions on setting up the combined shipping methods in your store.

Getting started

The WooCommerce Table Rate Shipping Pro plugin helps you offer a wide variety of combined shipping methods to your customers in their respective shipping zones. For instance, let’s get started with setting up the combined “Free” and “Paid” shipping methods. The following procedures help you configure these combined shipping in your store.

  1. Add the new products that has free and paid shipping.
  2. Add the shipping classes. 
  3. Assign these shipping classes to the products. The plugin uses these shipping classes to calculate the shipping costs.
  4. Configure the shipping method by adding the shipping zone and the shipping methods.
  5. Configure the rates for the shipping methods.
  6. View the results on your store.

The following sections provide detailed, step-by-step instructions for each procedure.

1. Adding New Products

This section provides instructions on adding two products using our plugin. For instance, we add the first product and call it Gift Certificate and the second product, Packaged Goods.

1. Click Products > Add New on the left navigation pane.

2. On the Add new product screen, type the product name as Gift Certificate. Specify its Regular price as $50 as shown in the following screen.

Add Gift Certificate

3. Click Publish on the right pane.

4. Similarly, click Products > Add New on the left navigation pane to add the product Packaged Goods. Specify its Regular price as $999.

5. Click Publish on the right pane.

Both products are now added in your store.

2. Adding the Shipping Classes

Shipping classes refer to the standardized shipping classifications used to group products of similar type and used by some shipping methods, such as Flat Rate Shipping to provide different rates to different classes of products. 
Here, we create two shipping classes – Free Shipping and Paid Shipping.

1. Click WooCommerce > Settings on the left pane.

2. Click the Shipping tab. The following screen appears.

Shipping Classes

3. Click Shipping classes as highlighted in the above screen.

4. Click Add shipping class at the bottom-right corner of the screen.

5. In the Shipping class name text box, type the first shipping class as Free Shipping and click Save shipping classes.

6. Click Add shipping class at the bottom-right corner of the screen, type the second shipping class name as Paid Shipping and click Save shipping classes.

Shipping Classes Added

3. Assigning Shipping Classes to Products

After adding the products and the shipping classes, assign the shipping classes to the products. In this example, we assign Free Shipping to Gift Certificate and Paid Shipping to Packaged GoodsThe WooCommerce Table Rate Shipping Pro plugin uses these shipping classes to calculate the shipping costs of the products.

1. Click Products on the left navigation pane.

2. On the right pane, click on the Gift Certificate product you created earlier.

3. Scroll down, click the Shipping tab and select Free Shipping as the shipping class to assign it to Gift Certificate. See the following screen.

Assign Free Shipping

4. Click Update on the right pane.

5. Click Products on the left navigation pane.

6. On the right pane, click on the Packaged Goods product you created earlier.

7. Scroll down, click the Shipping tab and select Paid Shipping as the shipping class to assign it to Packaged Goods

8. Click Update on the right pane.

4. Setting Up the Shipping Method

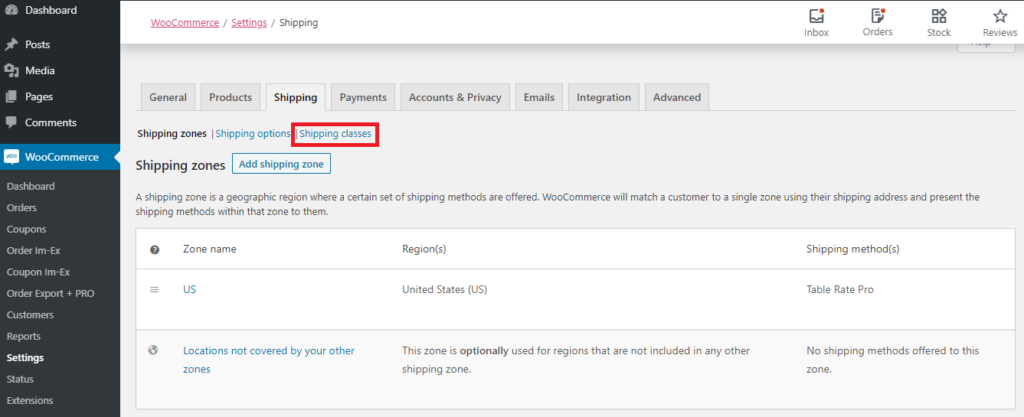
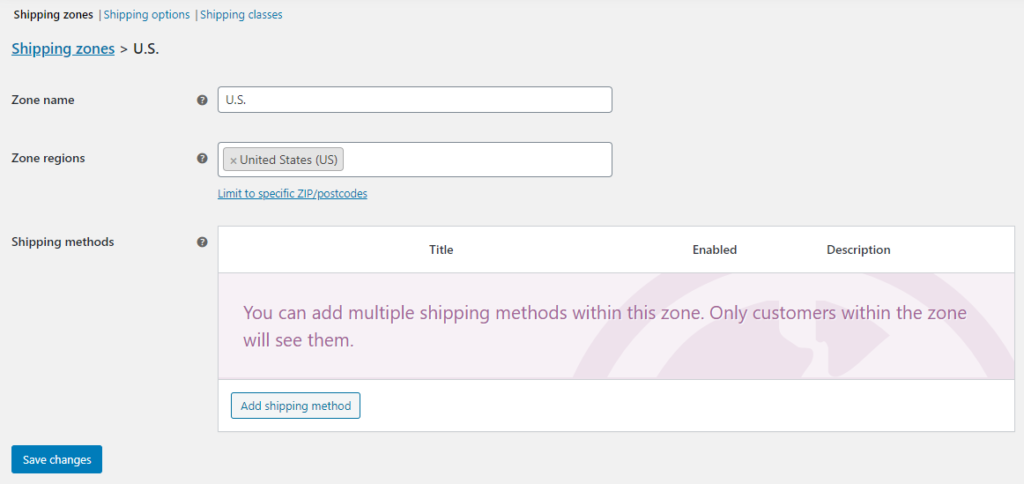
Firstly, we add a shipping zone for the customer based on their shipping address. In this procedure, we specify United States as the shipping zone.

Note: Shipping zone is a geographic region where specific sets of shipping methods are offered. WooCommerce synchronizes customers to a zone using their shipping address and presents shipping methods within that zone.

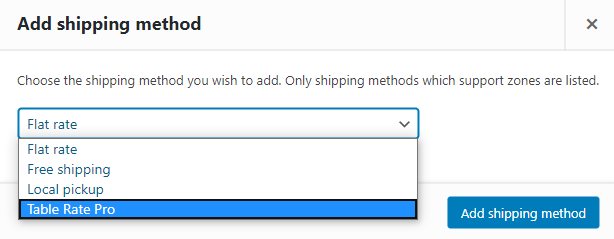
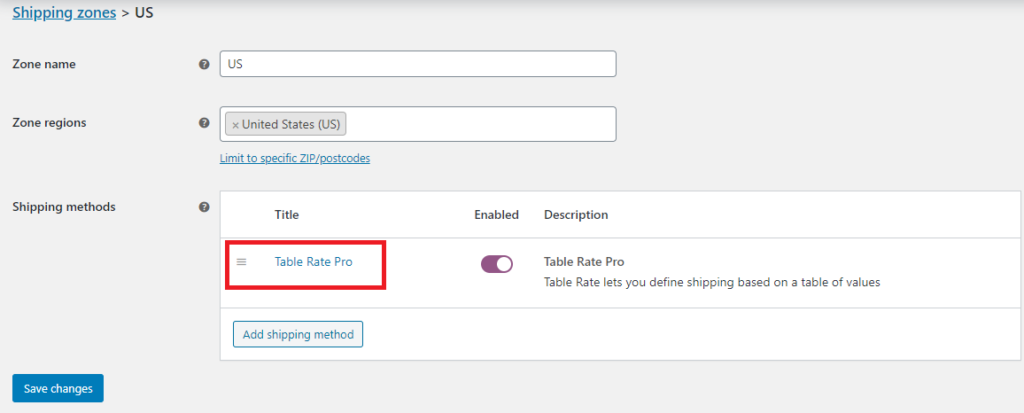
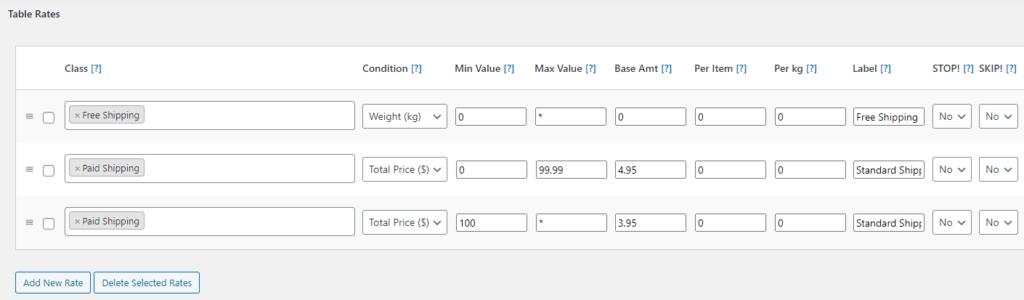
We then add a shipping method called Table Rate Pro to that zone. Once this is done, we configure the shipping rates.

1. Click WooCommerce Settings on the left pane.

2. Click the Shipping tab. 

3. Click Add shipping zone.

4. Type the Zone name as U.S. and select the Zone regions as United States as shown in the following screen.

Shipping Zone

5. Click Save changes.

6. Click Add shipping method. The Add shipping method window pops up.

7. Select Table Rate Pro.

Add Shipping Method

8.  Click Add shipping method. The new shipping method Table Rate Pro is added to the shipping zone as displayed in the following screen.

Table Rate Pro Shipping Method Added

9. Click on Table Rate Pro and then click Add New to add a new shipping rule to it.

10. Select the option Enable this shipping method as shown in the following screen.

Table Rate Pro Shipping Options

11. Type a title for the shipping method in Method Title. In this example, it is Standard Shipping.

12.  Click Add New Rate to set up some rates (one at a time) for Table Rate Pro.

13. Specify the rates as shown in the following screen.
Note: The value of * is infinity.

Free and Paid Shipping in WooCommerce

14. Click Save changes.

5. Viewing the Results

After configuring these values, it’s time to verify the results in your store.

1. On the top-left corner of the screen, click WooCommerce Plugins by JEM products > Visit StoreThe products Gift Certificate and Packaged Goods appear on your store.

Shop Example

2. Under Gift Certificate, click Add to cart > View cart. As per your shipping configurations, the cart displays Free Shipping for this product, as shown in the following screen.

Gift Cert - Cart Totals

3. Click Shop to view the shipping method for Packaged GoodsUnder Packaged Goods, click Add to cart > View cartBased on the total quantity and the price of the products, the cart displays the shipping method as Standard Shipping and the respective charges (base amount) of $4.95 is added to the subtotal amount, as highlighted in the following screen..

Standard Shipping

So, are you ready to offer your customers with a variety of shipping methods for specific set of products? Install our WooCommerce Table Rate Shipping Pro plugin today. For assistance, please feel free to contact us.

Share this post

Share on facebook
Share on google
Share on twitter
Share on linkedin
Share on pinterest
Share on print
Share on email
Scroll to Top
Scroll to Top