GIFs are short, animated image loops that are fun to share in messages, on social media, or even in your notes. If you’re using an iPhone, there are several easy ways to create a GIF using your photos, videos, or screen recordings — all without needing a computer.
Whether you’re converting a Live Photo, trimming a video, or using a GIF-making app, your iPhone gives you the tools you need to make GIFs quickly and easily.
Make a GIF from a Live Photo Using the Photos App
The fastest way to make a GIF on iPhone is by using the Live Photos feature in the built-in Photos app. Apple allows you to turn Live Photos into animated loops that behave just like GIFs.
Here’s how:
- Open the Photos app
- Tap on any Live Photo
- Swipe up on the photo
- Under Effects, choose either Loop or Bounce
- Your Live Photo will now play as a repeating animation
Once applied, the photo will act like a GIF when shared via iMessage, AirDrop, or WhatsApp. You can save it or send it directly.
Use the Shortcuts App to Convert Video or Live Photo to GIF
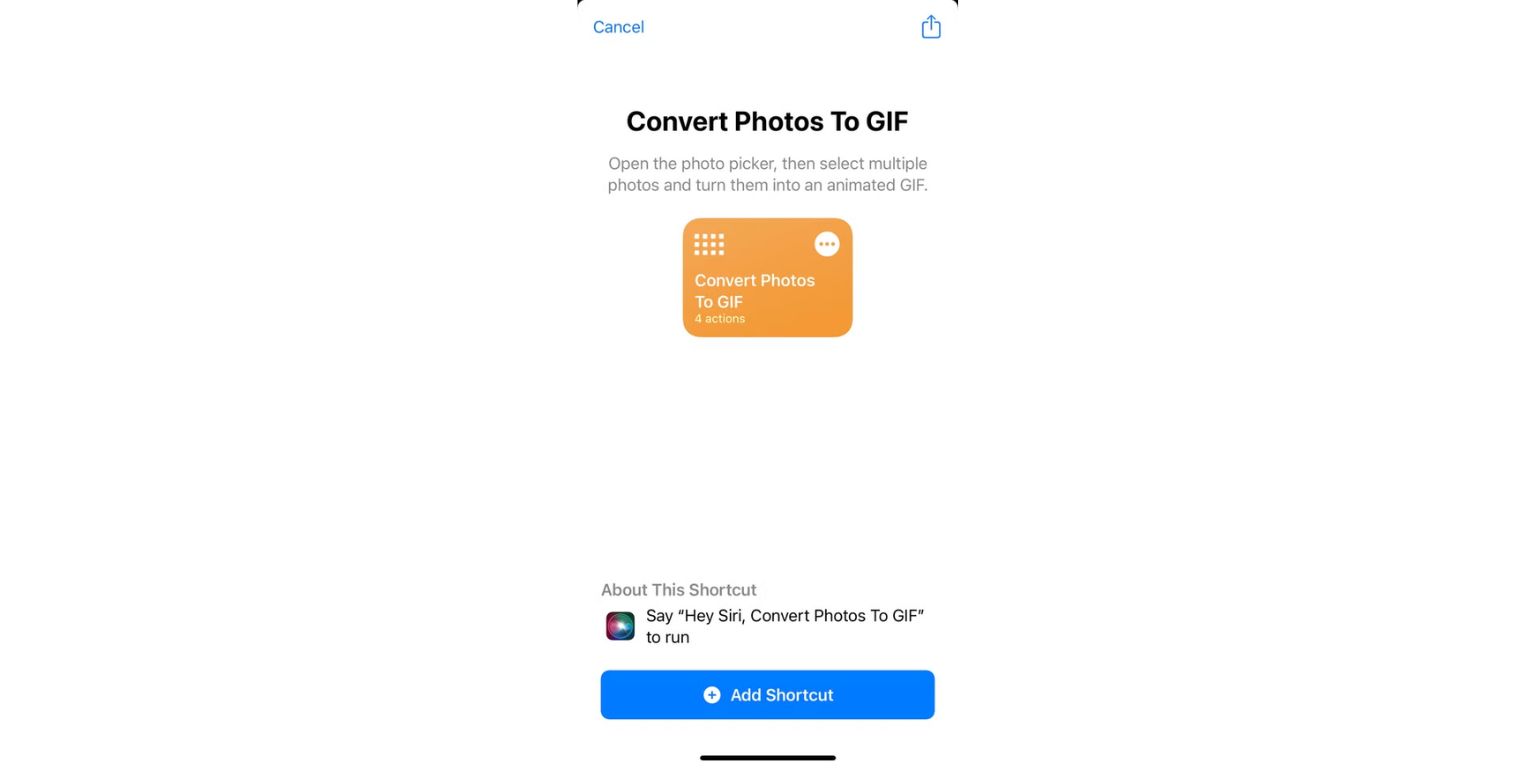
The Shortcuts app, developed by Apple, allows you to automate simple tasks like turning a video or Live Photo into a GIF.
To do this:
- Open the Shortcuts app (download it if not installed)
- Tap Gallery
- Search for Make GIF and tap Add Shortcut
- Run the shortcut
- Choose a video or Live Photo from your camera roll
- Wait for it to convert, then tap Share or Save
This method gives you control over what clip to convert, even letting you trim video length before exporting it as a GIF.
Use Third-Party Apps Like GIPHY or GIF Maker
There are several free apps on the App Store that offer more advanced GIF creation tools. These let you record new content or upload media and add text, stickers, or effects.
Popular options include:
- GIPHY – Search GIFs, create your own, and add stickers
- GIF Maker – ImgPlay – Edit, trim, and convert videos or Live Photos
- GIF Me! Camera – Record short clips directly into GIF format
Using these apps:
- Open the app and tap Create or New GIF
- Upload your content or record it directly
- Edit using built-in filters or captions
- Export or share the GIF from within the app
Apps like these are ideal for those who want more creativity, captions, or fun effects.
Save and Share GIFs on iPhone
Once your GIF is ready, you can find it in your Photos app or within the app you used to create it. GIFs behave like short videos and can be sent in:
- iMessage
- Instagram DMs
You can also copy a GIF to your clipboard and paste it into chats or social posts.
To make sharing faster, you can favorite the GIF or add it to an album in your Photos app.
How to Turn a Screen Recording into a GIF
If you want to capture your iPhone screen and convert it to a GIF, you can do that too.
Here’s how:
- Swipe down to open Control Center
- Tap Screen Record
- Stop recording when done (saved in Photos)
- Use Shortcuts or a third-party app to convert that screen video to a GIF
This method is great for tutorials, reactions, or gaming clips.
Final Tips for Better GIFs
- Keep your clip short — shorter GIFs are easier to share and load faster
- Live Photos work best for quick GIFs
- Use editing apps if you want captions or effects
- Check resolution if sharing on social platforms that compress files
- Use “Most Compatible” camera setting if saving photos in non-HEIC formats
With just your iPhone, you can make GIFs from nearly anything — whether it’s a silly face, a pet moment, or something on your screen.
Try it out and share your favorite creations with friends. If you’ve found a better app or tip, drop it in the comments for others to try.