WooCommerce Table Rate Shipping Plugin
This plugin allows you to define complex shipping rules that will allow you to ship your product all over the world using the correct shipping cost.
Whilst every store is unique and has its own individual needs, the plugin has been designed to provide enough flexibility to cater for your stores needs
If you need help at any time with this plugin you can reach us at https://jem-products.com/contact-us/
Installation
Your plugin is delivered as a zip file. WordPress makes it easy to install the plugin from this zip file. You need to make a note of where you have saved your zip file to on your computer.
From your WordPress dashboard goto “Plugins” the “Add New”
Towards the top of the page you should see an “Upload Plugin” button – see the screenshot below

Click the “Upload Plugin” button, then from the next page click the “Choose File” button and select the zip file that you saved.
Once you have uploaded the plugin click “Activate Plugin” and you are all set!
Before You Start
The first thing you need to do is spend some time thinking about what you want your shipping rules to look like. A little time spent now will make the whole process incredibly smooth and simple!
To create your rules, the plugin uses shipping classes, shipping services and shipping zones. Think about what you are trying to achieve and make a note of the rules on a piece of paper, spreadsheet or anywhere handy.
The Basics
The plugin calculates rules based on the following steps:
- First it will evaluate which Shipping Zone, the address matches with. If you’d like to find out more about Shipping Zones check out this link: https://jem-products.com/woocommerce-shipping-zones-tutorial/
- Next it will go through each Shipping Method for the matched Shipping Zone and see if there is match (more on how that match is made later)
So as you plan your shipping rules think carefully about the different geographic regions you would like. Maybe you are very simple and only ship to one country, maybe you have more complex needs and want to create a region for specific zip/post codes.
Shipping Zones
If you are unfamiliar with shipping zones, take a look at our article which will provide more info – you can see it here: https://jem-products.com/woocommerce-shipping-zones-tutorial/
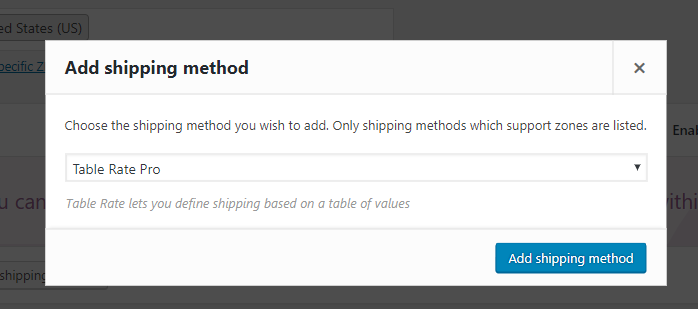
In this example will set up a shipping zone for the United States. We have to then add the Table Rate Pro shipping method into the zone

Once you click “Add shipping method” select “Table Rate Pro” from the drop down list and click the “Add Shipping Method” button
Next click the “Edit” link underneath Table Rate Pro

This will take you to the screen where you can now start creating the various shipping methods. A shipping method is an actual type of shipping. For example you might have “Standard”, “2 Day”, “Overnight” or a 3rd party like “DHL” or “UPS”.
In this example I’ll use “Standard”.
Click the “Add new” link to create a new shipping method.
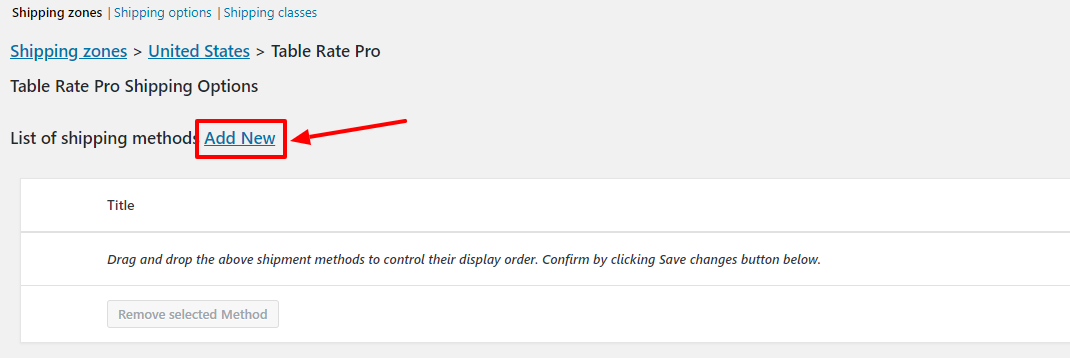
Now you will see the screen that lets youa setup the rules & rates for this shipping method. This is the main part of setting up the shipping.
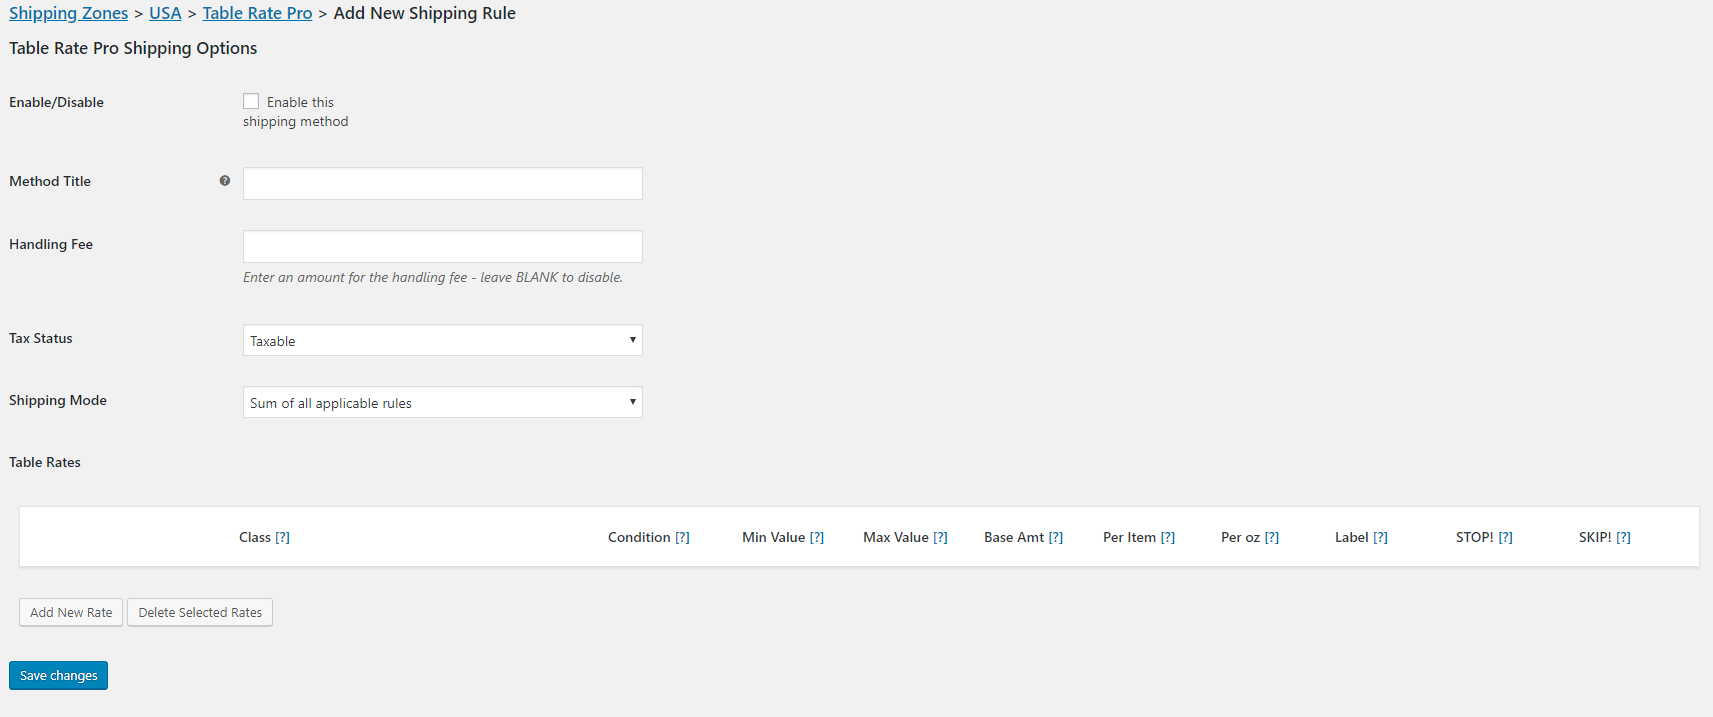
We’ll go through and discuss each of these settings.
Enable/Disable
This simply enables or disables this method. This is useful while you are testing different shipping methods, or you run a shipping special that you only want to turn on occasionally.
Method Title
This is the text that will appear both in the cart and also on the checkout page. Some common titles are “Standard”, “Overnight”, “UPS”, “DHL” etc
Handling Fee
This is an optional handling fee you can add to an entire order. This is useful if you have a shipping method that needs a single extra cost on top of the items in the customers cart
Tax Status
This tells WooCommerce if the shipping charges should be taxed or not
Shipping Mode
This dropdown has one of 3 values:
- Sum of all applicable rules: add together all the shipping values returned for each item in your cart. For example one item might match one rule and produce a value of $5, another item might match a different rule and produce a value of $2. If you you select the “sum” option the total shipping would be $7 in this case.
- Use highest shipping cost: if you select this mode the plugin will select the LARGEST value. So using the items form #1 above, selecting “Highest” would make the shipping $5, as $5 is the highest value calculated for any one rule.
- Use the lowest value: similar to #2 the plugin will select the SMALLEST value. Using the same example in this case it would be $2
Table Rates
These are the main rules that control how the shipping charge is calculated.
Rule Matching Overview
Before we go any further let’s go over how the rules are actually matched. The way the plugin works is a follows.
Once it has matched a shipping zone, it will get all the shipping methods for that zone that you have set up (say “Standard” and “Express”). It will look through the rules for shipping method and see if it can match ALL the items in the cart. If it can it will calculate the shipping for that shipping method. If it cannot match ALL the items in the cart then it will ignore that shipping method and move onto the next one.
It is very important to note it must be able to match ALL the items in the cart. It does this to make sure all items are eligible to be shipped via that method. For example if you had one bulky item that could not ship Overnight you would not want the Overnight shipping cost to be calculated.
Setting up the Rules
Now we can actually set up the rules. This is where the main parts of the shipping cost are calculates.
You can set up as many ‘rules’ here as you need. Simply click the “Add New Rate” button to insert rows. To delete rows first check the checkbox for the rows you wish to remove and then click “Delete Selected Rates”

As mentioned these rules represent the main part of the calculation. The rules are evaluated against the items in the cart. All the items in the cart MUST match a rule for that shipping method to be valid. If any item does NOT find a matching rule then a shipping cost will not be calculated for that shipping method. There are some examples later in the document that will help illustrate this.
We’ll walk through each field first:
Class
The class selection box allows you to select which shipping classes this rule applies to. You have several choices:
- No Class Set – this will match items in the cart that do NOT have a shipping class
- Any Class – this will match items that have ANY shipping class assigned to them
- Specific Shipping Classes – the dropdown will be populated with all the shipping classes you have defined and you can select any one of them
You must ALWAYS select at least one value
Condition
This column specifies what condition is the plugin looking to match on. Possible choices are:
- Weight – match based on the weight of the items (note the plugin will automatically adapt to the weight unit in your WooCommerce store – ounces or grams, you don’t have to do anything!)
- Total Price – the match will be on the total price of the items in the cart
- Item count – the plugin will match this rule based on the number of items in the cart
Min Value/Max Value
These next two columns use the Condition field and match based on it. You can enter number in these fields. For example if your conditon was “Item Count” and Min was 1 and Max was 20 – the rule would match all line items that had between 1 and 20 items. If you use an asterisk/star “*” in the max value it represents unlimited so if you have min set to 1 and max set to * it will match any number of items from 1 to unlimited (i.e. it will always match)
These next fields now contain the rule on what cost should be applied
Base Amt
The base amount specifies a shipping cost that you want to apply to this rule. It is a simple fixed number e.g. $9.99, $4.99 etc
Per Item
This specifies how much shipping to charge for EACH item. If you set this to $1 and you have 4 items, the shipping will be $4
Per oz
This specifies how much to charge based on the weight (the unit will match whatever is used in your WooCommerce store ounces or grams). If you set this to $1 and you have 6 ounces of weight, the shipping will be $6
Label
This field allows you to override the shipping label that is displayed to the customer. This can be useful in a number of instances, for example imagine if you had set up a Shipping Method of “Standard Shipping”. Every time a customer checked out they would see “Standard Shipping”. But if you wanted to run a promotion that if you spend more than $100 you get free shipping then you would want the label to say “Free Shipping” instead of “Standard Shipping”. You could use this label in that instance. There will be an example later in the manual that shows this feature
Stop!
This is a very interesting rule. Basically if this rule is matched the plugin will immediately stop checking the rest of this shipping method and use the calculated shipping from this for the entire shopping cart, You can use this in instances where say you have a heavy product that ships via freight, you can include any other products in that shipping cost as the freight charge will cover it all. There will be an example later showing exactly how this works.
Skip!
This is a great feature that allows you to skip or hide a shipping method if the rules match. Basically the plugin will look at this rule and if it matches any items in the cart it will skip this shipping method. See our example later in the manual which shows exactly how it works
Examples
Let’s run through some examples which will help illustrate how this works.
Shipping by Number of Items
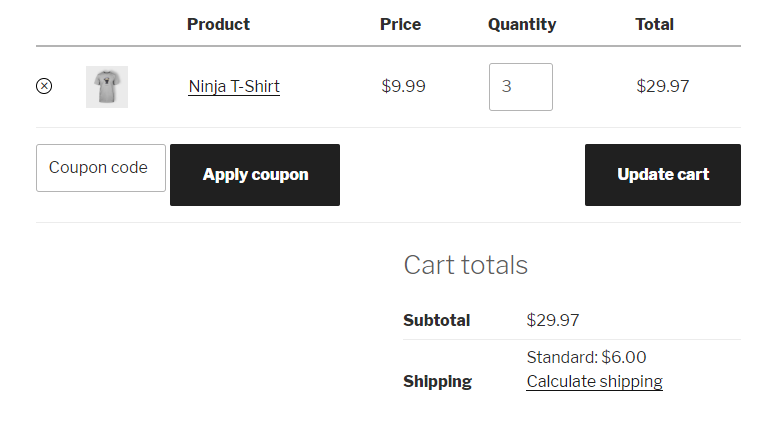
Let’s assume you sell T-shirts and they ship for $3 plus $1 per t-shirt. You would set the rules up as below

And if a customer ordered 3 t-shirts we would expect the shipping to be $3 plus 3 * $1 for a total of $6
Bulk Shipping Discount
Using the example above you may want use that calculation, but once you get past say 20 t-shirts you can start to offer a discount.
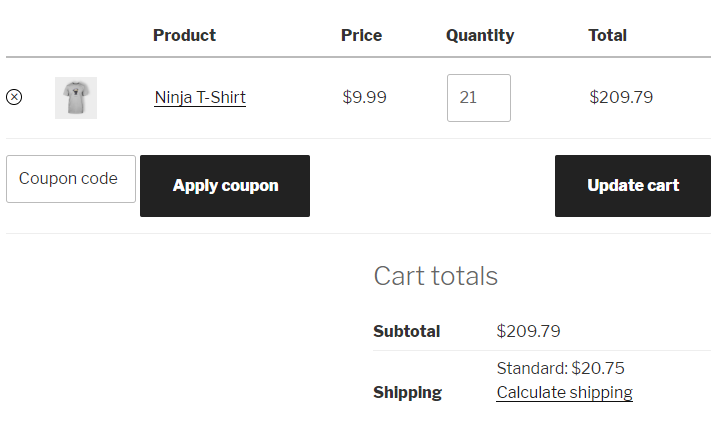
Let’s say for larger orders of t-shirts you use a different shipping carrier – they have a minimum but it is cheaper than the previous method. In this case cost is $5 plus $0.75 per t-shirt, but to meet the minimum the customer must order at least 21 t-shirts. The rules would look as follows:

For 21 t-shirts the shipping charge is $5 plus 21 * $0.75 = $20.75
Shipping Using Shipping Classes
Now let’s extend the above example. Let’s imagine your store has an item that is bulky and requires special shipping. Sometimes your customers just buy a bulky item, sometimes they buy bulky items and other items.
For our bulky items we have created a new shipping class “bulky” and added that class to the appropriate products
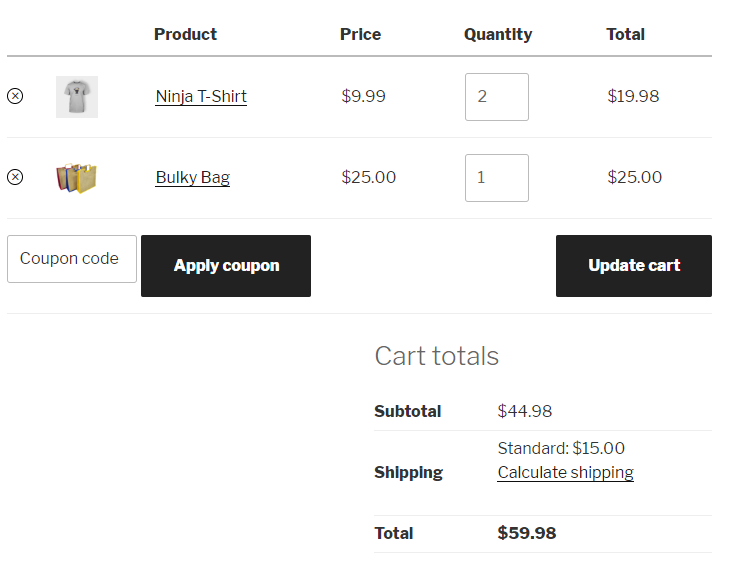
The bulky items cost a straight $10 per item to ship. Assuming we are keeping the existing settings above our new rules would look like this:

Now when we add the bulky item to the shopping cart you can see the plugin calculates the correct shipping cost
Using the STOP! feature & the Label feature
The next example will make use of the STOP! feature. In this scenario imagine your store ships a lot of items but you also have one or two items that are big and bulky and need to be shipped via ground courier or some other mechanism. When you use the ground courier you can add any other items the customer has purchased for no extra cost.
In this example we would set the rules up as follows:

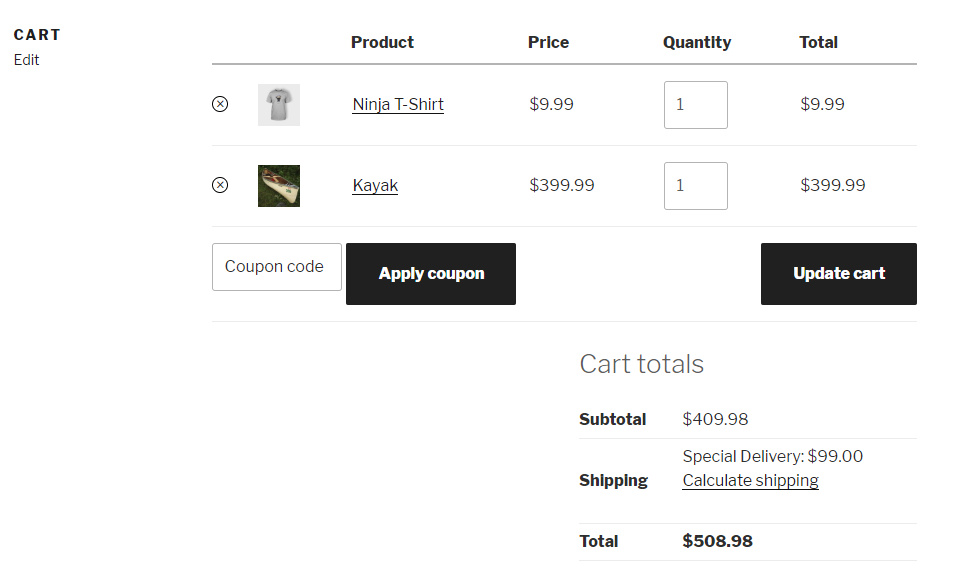
The rule for the T-shirt (2nd rule) should be relatively straightforward. The 1st rule is a little more detailed. What this rule is saying is if you get an item in your cart with the “Freight” shipping class then charge a base amount of $99 shipping. Also STOP – do not do any more calculations and use that value. In addition you’ll notice the “Label” field also is populated with “Special Delivery” – this will replace the usual text of “Standard Shipping” (that we set in the “Method Title” field).
You can see the effect in a cart below:
Using the SKIP! feature
This is a very nice feature – basically it allows you to skip or hide a shipping method
Let’s say you have Air Shipping but there are some products that are not allowed/able to be shipped by Air. In this case you can use this flag to skip this method.
Take a look at this example:

What this rule is saying is: Skip this shipping method if we get an item in our cart with the class of “pallet”.
You can probably see just how powerful this is!